
Visual Cryptography
|
This article is about Visual Cryptography. Visual Cryptography is a technique that allows information (images, text, diagrams …) to be encrypted using an encoding system that can be decrypted by the eyes. It does not require a computer to decode. |
 |
The technique I’m going to describe is attributed to two great mathematicians: Moni Naor and Adi Shamir, in 1994. In this implementation, I'm going to show how to split a secret message into two components. Both parts are necessary to reconstruct and reveal the secret, and the possession of either one, alone, is useless in determining the secret.
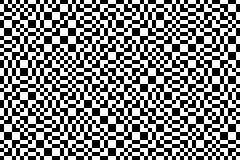 |
The basis of the technique is the superposition (overlaying) of two semi-transparent layers. Imagine two sheets of transparency covered with a seemingly random collection of black pixels. |
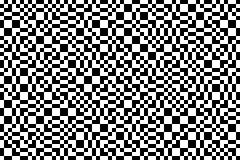 |
Individually, there is no discernable message printed on either one of the sheets. Overlapping them creates addition interference to the light passing through (mathematically the equivalent of performing a Boolean OR operation with the images), but still it just looks like a random collection of pixels.
 |
Mysteriously, however, if the two grids are overlaid correctly, at just the right position, a message magically appears! The patterns are designed to reveal a message. |
 |
Demonstration
Let’s look at couple of examples of this in action, then we’ll describe how the technique works.
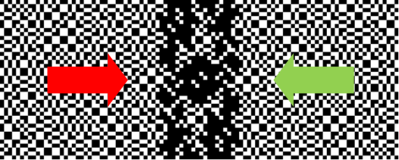
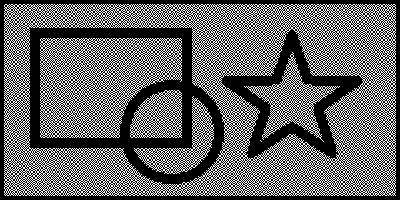
Below you will see two random looking rectangles of dots. One is fixed in the center, and the other you can drag around the canvas. As the rectangles intersect, the images merge. If you align the rectangles perfectly, a hidden message will appear. There are three hidden message to see in this demonstration, once you’ve decoded one, click on the square button in the bottom left to advance to the next.

To give you feedback, once the images are perfectly aligned, the advance button will go blank with a red border (don’t worry, your computer will not self-destruct in five seconds)
How does it work?
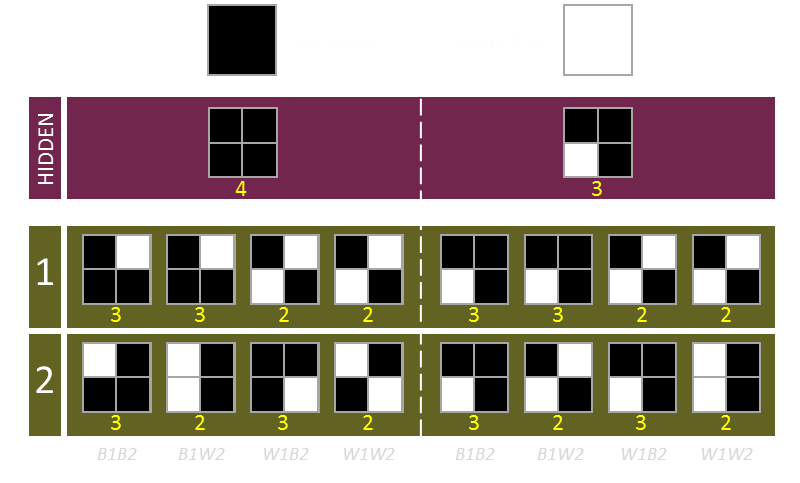
First we take a monochrome image for the source. Pixels in the image are either white or black. To the right is the source for the first example we saw above. |
 |
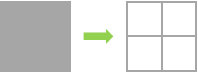 |
Next we sub-divide each pixel into four smaller subpixels. We need to shade these four subpixels to represent the source image, then subjectively divide them between the two cypher images we are to create. |
We need to distribute the shading such that, if you have just one of the cypher images, it is impossible to determine what is on the other cypher image, and thus, impossible to decrypt the image.
What we do is look at the color of each pixel in the original source image. If the original pixel in the image is set (black), we fill in all four sub pixels then distribute them two per cypher layer. We flip a coin to determine which pattern we place on which layer (so that it is random). It does not matter which pair of pixels goes on which layer, when they are combined, all four pixels will be black.
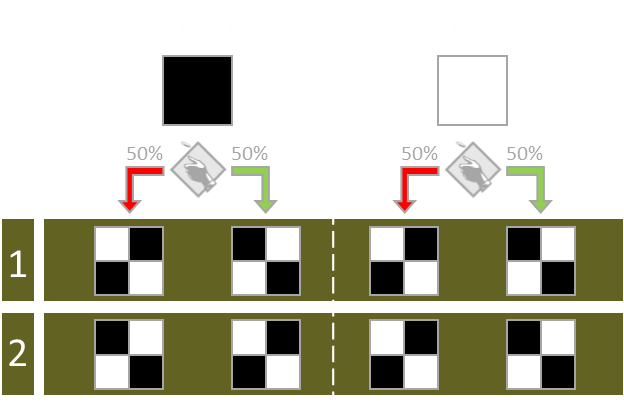 |
Conversely, if the source image pixel is white, we shade in just two pixels. This time, however, we make sure that the same pixels are shaded on both layers. In this way, when the two cypher images are combined, only two pixels are shaded. As before, we flip a coin to determine which chiral set we go with, and make sure the same image appears on both layers.
 |
The result of this process is two images (both four times as large as the original) which when combined result in an image with half the contrast of the original. The black of the source remains black in the combined cypher, but the white in the source is changed to a randomly mottled half-tone gray. Luckily this is still sufficiently high enough contrast for the secret message to be easily read. |
Someone who has possession of only one of the cypher images will be able to determine the (2 x 2) pattern of each pixel but has no idea if the corresponding pixel cluster on the other image is the same (white space), or opposite (black pixel). Every grid of (2 x 2) sub pixels on both layers contains exactly two pixels.
|
Of course, the two pixels selected do not have to follow checker-board pattern I used above. As long as two are shaded at random, and the rules followed as to whether the same, or complementary, pixels are shaded on the other layer, the system will work. |
 |
Here is a short animation of a some of these (2 x 2) pixel sub-blocks sliding over each other:
Pretty cool, huh? Well hold on, it gets cooler …
Moni Naor, Adi Shamir, and more people …
The original paper by Naor and Shamir talks about how to implement this system in a more generic way. For instance, instead of splitting the image into just two cypher texts, why don't we split the image between n-cyphertexts; all of which are needed to be combined to reveal the final image? (Or possibly a subset of any k images out of these n).
If you are interested in reading more, you can find a reprint of the original paper here.
As an example, here are some (3 x 3) sub-elements that could be used to distribute an image over four cypher images, all of which are needed to be combined to reveal the secret images:
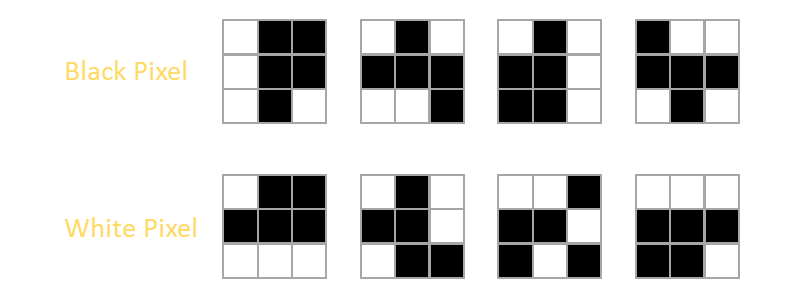
The top line shows the subpixels used to represent a black pixel in the original images, and the bottom line a white pixel.
Any single share contains exactly five black subpixels.
Any stacked pair contains exactly seven black subpixels.
Any stacked triplet contains eight black subpixels.
|
However, when all four in each row are combined, the top row contains nine subpixels (all black), whilst the lower row contains only eight (allowing light to shine through and creating the contrast necessary to read the image). You can see from this how the colluding of any two or any three people is not enough to reveal the secret. (Mathematically it's possible to do this with eight, not nine, sub-pixels , but there's no easy way to sub divide and pack a square array with eight!) |
 |
Deeper down the rabbit hole: Visual Steganography
 |
We can use this technique to do something even cooler! Imagine that, in addition to the two source images, we have a third secret image we want to encode. Let’s say we want to produce two cypher images that look ‘innocent’, but secretly hide the third. The generated two cypher images could be printed on transparencies and made to look like legitimate images of no consequence. However, these images, when combined in just the correct way, could be used reveal a third message. The technology of hiding images inside other images is called Steganography. |
I’ve done this below. Trust me, you’re not going to believe this at first. You’re going to be convinced that there is some ‘behind the scenes’ script at work that changes the image. I assure you this is not the case. You’re still not going to believe me!
Below, on the left, is my name, encoded from a monochrome image, and also containing partial details of a third hidden image. On the right is the word ‘Fish’, similarly encoded. Now, drag the right image over to the left image and watch what happens when they overlap perfectly. Wham! How cool is that?
How does this magic work?
The hidden image we are encoding has black pixels and white pixels. As before, we sub divide each pixel into (2 x 2) subpixels. When the two images are combined, we want to represent the black pixels of the hidden image by having all four subpixels black. We’ll represent the white pixels has having three subpixels black. This is sufficient contrast for the hidden image to be seen.
For each black or white pixel in the hidden image, there are four possible combinations of black and white pixels of the two source images. For the two source images, we’re going to say that any three black subpixels represents black in that source image, and any two pixels represents white.
Examples of all eight permutations of source, image 1 and image 2 are depicted below:
When the hidden image pixel is BLACK:
The combined two cypher images (OR) have to have all four subpixels set.
When both source images also have a black pixel, this is easy. Both cypher images need to have three out of the four subpixels set. The only constraint is that the missing subpixel is not the same on both layers. One subpixel is randomly selected on the first layer, and one is randomly select from the other three on the second layer.
When the first image has a black pixel (requiring three subpixels set), and the second image has a white pixel (requiring two subpixels set), as above, first, a random single subpixel is selected on the black layer to remove. Next two subpixels are randomly selected on the second layer with the constraint that one of the selected subpixels is the same as the gap in the first layer. In this way, when the two are combined, four black subpixels are displayed.
The opposite happens when the first layer is white, and the second layer is black.
Finally, if both source pixels are white (requiring just two subpixels set), two subpixels are selected at random on the first layer, and the inverse of this selection used for the second layer.
When the hidden image pixel is WHITE:
The combined two cypher images (OR) have to have any three subpixels set.
When both source images have a black pixel, this is easy. Both cypher images need to have three out of the four subpixels set, and these need to be the same subpixels. Three subpixels are randomly selected and these are set on both of the cypher image layers.
When the first image has a black pixel (requiring three subpixels set), and the second image has a white pixel (requiring two subpixels set), as above, first, three random subpixels are selected on the first layer. Next one of these three subpixels is randomly selected for removal and this pattern is used on the second layer.
The opposite happens when the first layer is white, and the second layer is black.
Finally, if both source pixels are white (requiring two subpixels set), two are selected at random on the first layer, then one of these is duplicated on the second layer, and a second random subpixel is selected on the second layer (from the two white subpixels not selected on the first layer). Both layers have two subpixels, and when combined, there are three subpixels visbile.
Other potential uses of the concept
The ability to give an answer, and potentially mask a true answer to a question, tangentially, reminds me of a technique used to get truthful representations in surveys where the subject is potentially embarrassing or where there is incentive to not give a truthful answer.
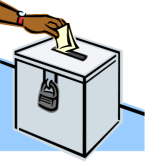 |
Imagine you are conducting a survey with the aim of measuring certain characteristics of your audience, and the subject of some of the questions is sensitive (for example, questions about political preference, sexual orientation, whether you have committed fraud, or cheated, or made a mistake that has cost your company thousands of dollars). People might have a motivation to give a non-truthful answers, possible from embarrassment, peer pressure, or fear. Also, paranoid people might not want to give truthful answers for fear that, even if the survey is anonymous, answers to other questions might be enough to allow an individual to be distinctly identified and thus his answers to the sensitive questions determined. |
|
The solution? Give the people taking your questionnaire a coin. When the question appears e.g. “Have you ever made a mistake that has cost your company thousands of dollars?”, ask the subject to flip a coin. If the coin comes up HEADS, tell the person to answer the question truthfully. If the coin comes up TAILS, tell the person to flip the coin again and if the coin lands HEADS to answer ”Yes” and if the second flip comes up TAILS to answer the question ”No”. |
 |
Any person looking at the survey results and seeing a ”Yes” on an answer will not know if any single person's answer is truthful, or the result of a coin flip. Any person can be free of embarrassment as none of his/her peers will know either.
 |
The law of large numbers, however, will allow a good estimate of the number of people "Who have made a costly mistake", because you’d be able to subtract the number of expected fake ”Yes” answers, then scale up the remainder of the answers. |
Other articles related to this topic
If you liked this article, you might also like this article about Steganography, and this one about Sharing Secrets.
You can find a complete list of all the articles here. Click here to receive email alerts on new articles.

© 2009-2013 DataGenetics Privacy Policy